LED - 3. Let's make a large led display - Part 3 (Testing Single RGB LED Matrix)
Many part of this document is derived from Adafruit RGB Matrix + Real Time Clock HAT for Raspberry Pi.
I've installed the required s/w at /home/pi/rpi-rgb-led-matrix directory. As I'm testing the 32 X 64 pixels RGB LED Matrix, I'm using --led-rows=32, --led-cols=64 parameters.
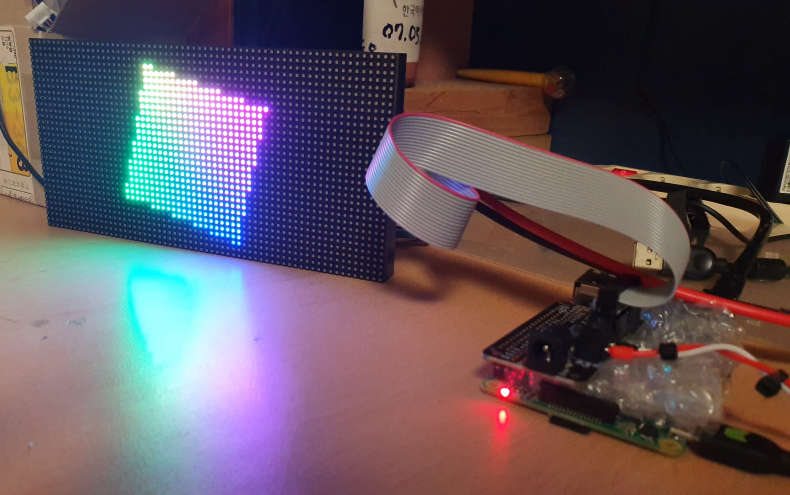
If everything is OK, you may see this rotating rectangle screen.
This is demo program's help page
Use D1 options to scroll the text and icons.

This can be understood as a file format created to increase cross-platform compatibility of image files. Since OpenCV, PIL which we usually use for image processing, supports ppm file, we can treat it as a kind of image file like png and jpg file.
Run this code at "/home/pi/rpi-rgb-led-matrix/examples-api-use".
You can see the runtext.ppm file. I ran this python scripts at Windows 10. Perhaps PIL converts the ppm file to a png file to view the image normally in the Windows image viewer(Windows image viewer title has png extension) .

Python examples are included in the rpi-rgb-led-matrix/bindings/python/samples directory. The matrix installer script has already loaded the prerequisite Python Imaging Library and installed the rgbmatrix module for both Python 2.7 and Python 3.
You can see the scrolling text as in the example above. You don't have to use ppm files, you can also use other image format like png.
This is wire-up-icon.png image that scrolls.

So modify this file for your RGB LED Matrix configurations, and you can avoid the hassle of specifying these options every time you run a Python program.
Testing Single RGB LED Matrix (32 X 64)
Testing with sample program
First, check the wiring and power connections. Then run the sample program.I've installed the required s/w at /home/pi/rpi-rgb-led-matrix directory. As I'm testing the 32 X 64 pixels RGB LED Matrix, I'm using --led-rows=32, --led-cols=64 parameters.
pi@raspberrypi:~/rpi-rgb-led-matrix/examples-api-use $ pwd
/home/pi/rpi-rgb-led-matrix/examples-api-use
pi@raspberrypi:~/rpi-rgb-led-matrix/examples-api-use $ sudo ./demo -D0 --led-rows=32 --led-cols=64
If everything is OK, you may see this rotating rectangle screen.
This is demo program's help page
Expected required option -D <demo>
usage: ./demo <options> -D <demo-nr> [optional parameter]
Options:
        -D <demo-nr>              : Always needs to be set
        -t <seconds>              : Run for these number of seconds, then exit.
        --led-gpio-mapping=<name> : Name of GPIO mapping used. Default "adafruit-hat"
        --led-rows=<rows>         : Panel rows. Typically 8, 16, 32 or 64. (Default: 32).
        --led-cols=<cols>         : Panel columns. Typically 32 or 64. (Default: 32).
        --led-chain=<chained>     : Number of daisy-chained panels. (Default: 1).
        --led-parallel=<parallel> : Parallel chains. range=1..3 (Default: 1).
        --led-multiplexing=<0..10> : Mux type: 0=direct; 1=Stripe; 2=Checkered; 3=Spiral; 4=ZStripe; 5=ZnMirrorZStripe; 6=coreman; 7=Kaler2Scan; 8=ZStripeUneven; 9=P10-128x4-Z; 10=QiangLiQ8 (Default: 0)
        --led-pixel-mapper        : Semicolon-separated list of pixel-mappers to arrange pixels.
                                    Optional params after a colon e.g. "U-mapper;Rotate:90"
                                    Available: "Rotate", "U-mapper". Default: ""
        --led-pwm-bits=<1..11>    : PWM bits (Default: 11).
        --led-brightness=<percent>: Brightness in percent (Default: 100).
        --led-scan-mode=<0..1>    : 0 = progressive; 1 = interlaced (Default: 0).
        --led-row-addr-type=<0..3>: 0 = default; 1 = AB-addressed panels; 2 = direct row select; 3 = ABC-addressed panels (experimental) (Default: 0).
        --led-show-refresh        : Show refresh rate.
        --led-inverse             : Switch if your matrix has inverse colors on.
        --led-rgb-sequence        : Switch if your matrix has led colors swapped (Default: "RGB")
        --led-pwm-lsb-nanoseconds : PWM Nanoseconds for LSB (Default: 130)
        --led-pwm-dither-bits=<0..2> : Time dithering of lower bits (Default: 0)
        --led-hardware-pulse   : Use hardware pin-pulse generation.
        --led-panel-type=<name>   : Needed to initialize special panels. Supported: 'FM6126A'
        --led-slowdown-gpio=<0..4>: Slowdown GPIO. Needed for faster Pis/slower panels (Default: 1).
        --led-daemon              : Make the process run in the background as daemon.
        --led-no-drop-privs       : Don't drop privileges from 'root' after initializing the hardware.
Demos, choosen with -D
        0  - some rotating square
        1  - forward scrolling an image (-m <scroll-ms>)
        2  - backward scrolling an image (-m <scroll-ms>)
        3  - test image: a square
        4  - Pulsing color
        5  - Grayscale Block
        6  - Abelian sandpile model (-m <time-step-ms>)
        7  - Conway's game of life (-m <time-step-ms>)
        8  - Langton's ant (-m <time-step-ms>)
        9  - Volume bars (-m <time-step-ms>)
        10 - Evolution of color (-m <time-step-ms>)
        11 - Brightness pulse generator
Example:
        ./demo -t 10 -D 1 runtext.ppm
Scrolls the runtext for 10 seconds
Use D1 options to scroll the text and icons.
pi@raspberrypi:~/rpi-rgb-led-matrix/examples-api-use $ sudo ./demo -D1 --led-rows=32 --led-cols=64 runtext.ppm
ppm file
The portable pixmap format (PPM), the portable graymap format (PGM) and the portable bitmap format (PBM) are image file formats designed to be easily exchanged between platforms. They are also sometimes referred to collectively as the portable anymap format (PNM),[4][5] not to be confused with the related portable arbitrary map format.This can be understood as a file format created to increase cross-platform compatibility of image files. Since OpenCV, PIL which we usually use for image processing, supports ppm file, we can treat it as a kind of image file like png and jpg file.
Run this code at "/home/pi/rpi-rgb-led-matrix/examples-api-use".
#pip3 install pillow
#python3
Python 3.6.7 (v3.6.7:6ec5cf24b7, Oct 20 2018, 13:35:33) [MSC v.1900 64 bit (AMD64)] on win32
Type "help", "copyright", "credits" or "license" for more information.
>>> from PIL import Image
>>> im = Image.open('runtext.ppm')
>>> im.show()
>>> exit()
You can see the runtext.ppm file. I ran this python scripts at Windows 10. Perhaps PIL converts the ppm file to a png file to view the image normally in the Windows image viewer(Windows image viewer title has png extension) .

Testing with python program
We confirmed that the RGB LED is working properly. Now let's print out the text and pictures we want using Python.Python examples are included in the rpi-rgb-led-matrix/bindings/python/samples directory. The matrix installer script has already loaded the prerequisite Python Imaging Library and installed the rgbmatrix module for both Python 2.7 and Python 3.
pi@raspberrypi:~/rpi-rgb-led-matrix/bindings/python/samples $ sudo python image-scroller.py  --led-cols=64 --led-rows=32
Press CTRL-C to stop sample
^CExiting
You can see the scrolling text as in the example above. You don't have to use ppm files, you can also use other image format like png.
pi@raspberrypi:~/rpi-rgb-led-matrix/bindings/python/samples $ sudo python image-scroller.py -i ../../../img/wire-up-icon.png --led-cols=64 --led-rows=32
Press CTRL-C to stop sample
^CExiting
This is wire-up-icon.png image that scrolls.
Wrapping up
rpi-rgb-led-matrix/bindings/python/samples/samplebase.py is a base python files. Many sample python files' class is derived from SampleBase. And this file contains code to manipulate the option parameters like --led-cols, --led-rows, --led-chain ....So modify this file for your RGB LED Matrix configurations, and you can avoid the hassle of specifying these options every time you run a Python program.


댓글
댓글 쓰기