1월, 2020의 게시물 표시

LED - 3. Let's make a large led display - Part 5 (N X M RGB LED Matrices)

이미지
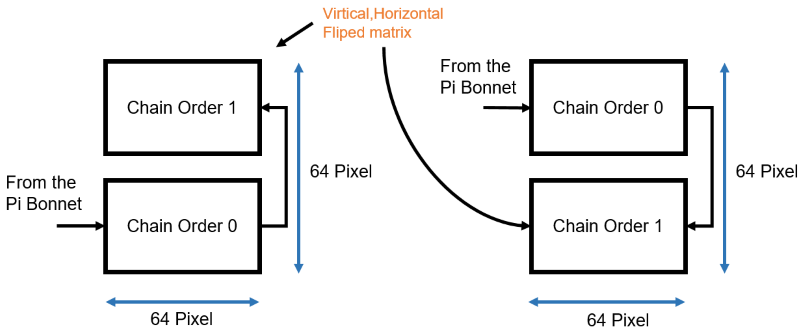
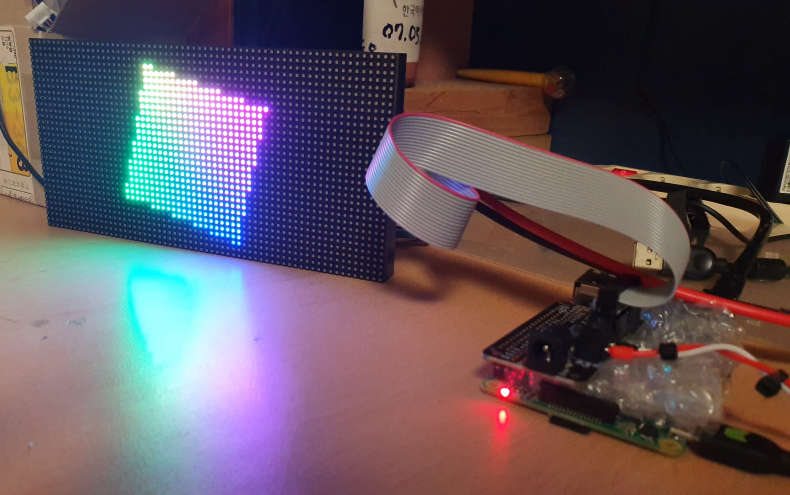
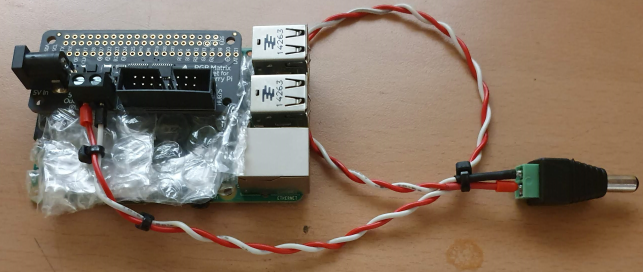
Connect 1 X 2 RGB LED Matrix with 1 chain In the previous post, I connected several matrices in a single line. This time, we will make an LED display with N X N structure. As before, using daisy chaining is the same. It will just redesign the software to implement the screen. First let's stack the RGB LED matrices vertically.  It doesn't matter which of the two pictures above. This post uses the first approach. First prepare an image of size 64 X 64.  Devide the image into two parts, the top and the bottom.  Make a flip image of top part in horizontal, vertical direction.  Connect the two images horizontally to create a new 128 X 32 image. Display the image. This requires splitting, flipping, and merging the image. For this task, I will use OpenCV as well as the PIL. See below for installation of OpenCV. splitting, flipping, and merging the image import argparse import cv2 import numpy as np from PIL import Image from PIL impo

LED - 3. Let's make a large led display - Part 4 (connect multiple RGB LED Matrices)

이미지
Connect multiple RGB LED Matrix Connecting the RGB LED Matrix is ​​really easy. When you connect the Hub 75 interfaces of the two modules, you are done. One thing to note is that you must connect Hub75 at the beginning of the next module to Hub75 at the end of the arrow. And be sure to connect 5V power cable to the second module. If you want to connect three Matrix, connect Hub75 at the end of the arrow of the second module and Hub75 at the start of the arrow of the third module. This type of connection is called a daisy chain. Daisy chain From Wikipedia. In electrical and electronic engineering a daisy chain is a wiring scheme in which multiple devices are wired together in sequence or in a ring, [1] similar to a garland of daisy flowers . Other than a full, single loop, systems which contain internal loops cannot be called daisy chains. Daisy chains may be used for power, analog signals, digital data, or a combination thereof. The term daisy chain may refer either

LED - 3. Let's make a large led display - Part 3 (Testing Single RGB LED Matrix)

이미지
Many part of this document is derived from Adafruit RGB Matrix + Real Time Clock HAT for Raspberry Pi. Testing Single RGB LED Matrix (32 X 64) Testing with sample program First, check the wiring and power connections. Then run the sample program. I've installed the required s/w at /home/pi/rpi-rgb-led-matrix directory. As I'm testing the 32 X 64 pixels RGB LED Matrix, I'm using --led-rows=32, --led-cols=64 parameters. pi @ raspberrypi :~/ rpi-rgb-led-matrix / examples-api-use $ pwd / home / pi / rpi-rgb-led-matrix / examples-api-use pi @ raspberrypi :~/ rpi-rgb-led-matrix / examples-api-use $ sudo ./ demo - D0 -- led-rows = 32 -- led-cols = 64 If everything is OK, you may see this rotating rectangle screen. This is demo program's help page Expected required option - D < demo > usage : . / demo < options > - D < demo-nr > [optional parameter] Options : - D < demo-nr > : Always needs t

LED - 3. Let's make a large led display - Part 2 (Prepare Raspberry Pi with RGB Matrix Bonnet)

이미지
Many part of this document is derived from Adafruit RGB Matrix + Real Time Clock HAT for Raspberry Pi. I will use the Bonnet type. If you are using the HAT type, go to https://learn.adafruit.com/adafruit-rgb-matrix-plus-real-time-clock-hat-for-raspberry-pi and solder the HAT first. Raspberry with RGB Matrix Bonnet Plug HAT/Bonnet into Raspberry Pi I used Adafruit RGB Matrix Bonnet which is suitable for Raspberry Pi Zero. However, the GPIO pinouts are the same, so you can use it on Raspberry Pi 3B, 3B+. To prevent shorts caused by contact between the bonnet and the Raspberry Pi, I filled vinyl between the Bonnet and Pi. The RGB matrix Bonnet's barrel jack accepts 5V power and shares the Pi's 5V rail. So in theory, the Raspberry Pi can be operated from the bonnet power supply without the need for a separate 5V supply. But Adafruit recommands to use an independent 5V supply for Pi. Shut down your Pi and remove power. Plug the HAT or Bonnet on so all the 2x20 pi