LED - 3. Let's make a large led display - Part 5 (N X M RGB LED Matrices)
Connect 1 X 2 RGB LED Matrix with 1 chain
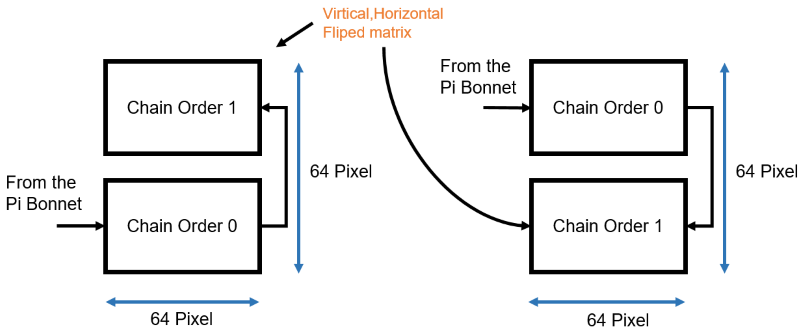
In the previous post, I connected several matrices in a single line. This time, we will make an LED display with N X N structure. As before, using daisy chaining is the same. It will just redesign the software to implement the screen.First let's stack the RGB LED matrices vertically.
It doesn't matter which of the two pictures above. This post uses the first approach.
- First prepare an image of size 64 X 64.
- Devide the image into two parts, the top and the bottom.
- Make a flip image of top part in horizontal, vertical direction.
- Connect the two images horizontally to create a new 128 X 32 image.
- Display the image.

This requires splitting, flipping, and merging the image. For this task, I will use OpenCV as well as the PIL. See below for installation of OpenCV.
splitting, flipping, and merging the image
import argparse
import cv2
import numpy as np
from PIL import Image
from PIL import ImageDraw
from rgbmatrix import RGBMatrix, RGBMatrixOptions
import time

# Configuration for the matrix
options = RGBMatrixOptions()
options.cols = 64
options.rows = 32
options.chain_length = 2
options.parallel = 1
#options.hardware_mapping = 'adafruit-hat'  # If you have an Adafruit HAT: 'adafruit-hat'
matrix = RGBMatrix(options = options)

print('Matrix H:%d W:%d'%(matrix.height, matrix.width))


parser = argparse.ArgumentParser(description="OpenCV Example")
parser.add_argument("--file", type=str, help="file name")
args = parser.parse_args()

img = cv2.imread(args.file, cv2.IMREAD_COLOR)
img = cv2.resize(img, (int(matrix.width / 2), matrix.height * 2))
height, width, channels = img.shape
print('H:%d W:%d'%(height, width))
y_end = int(height / 2)
x_end = width

'''
split the image top, bottom
'''
top_img = img[0: y_end, 0:x_end]
bottom_img = img[y_end: y_end * 2, 0:x_end]

'''
flip the image
'''
top_img = cv2.flip(top_img, 0) #vertical
top_img = cv2.flip(top_img, 1) #horizontal

final = np.concatenate((top_img, bottom_img), axis=1)   #stack horizontally
final = cv2.cvtColor(final, cv2.COLOR_BGR2RGB)
h, w, c = final.shape
print('final image H:%d W:%d'%(h, w))
im_pil = Image.fromarray(final)


matrix.Clear()
matrix.SetImage(im_pil, 0)
time.sleep(10)
Run the code. Be careful that I'm root user now, so I don't have to use sudo command.
root@raspberrypi:/home/pi/rpi-rgb-led-matrix/bindings/python/samples# python3 twobytwo.py --file=run.jpg
Matrix H:32 W:128
H:64 W:64
final image H:32 W:128

Connect 2 X 2 RGB LED Matrix with 1 chain
The code above can be used without modification.
<2 X 2 display daisy connection>
- First prepare an image of size 128 X 64.
- Devide the image into two parts, the top and the bottom.
- Make a flip image of top part in horizontal, vertical direction.
- Connect the two images horizontally to create a new 256 X 32 image.
- Display the image.
More stacking?
The code above divides the image into the top and bottom. But now divide into N images vertically.
<N X M RGB LED matrix>
You do not have to configure the display as shown above. It can be connected from top to bottom, or can be configured to avoid flipping using long Hub 75 cables. The following source code can be used flexibly with the above configuration.
import argparse
import cv2
import numpy as np
from PIL import Image
from PIL import ImageDraw
from rgbmatrix import RGBMatrix, RGBMatrixOptions
import time

parser = argparse.ArgumentParser(description="OpenCV Example")
parser.add_argument("--file", type=str, help="file name")
parser.add_argument("--horizontal", type=int, default = 1, help="horizontal count")
parser.add_argument("--vertical", type=int, default = 1, help="vertical count")
args = parser.parse_args()

# Configuration for the matrix
options = RGBMatrixOptions()
options.cols = 64
options.rows = 32
options.chain_length = args.horizontal * args.vertical
options.parallel = 1
#options.hardware_mapping = 'adafruit-hat'  # If you have an Adafruit HAT: 'adafruit-hat'
matrix = RGBMatrix(options = options)

canvas_w = args.horizontal * options.cols
canvas_h = args.vertical * options.rows

print('Matrix H:%d W:%d'%(matrix.height, matrix.width))
print('Image size H:%d W:%d'%(canvas_h, canvas_w))

img = cv2.imread(args.file, cv2.IMREAD_COLOR)
img = cv2.resize(img, (canvas_w, canvas_h))
img = cv2.cvtColor(final, cv2.COLOR_BGR2RGB)
for x in range (args.vertical):
    i = img[options.rows * x: options.rows * (x + 1), 0:canvas_w]
    h, w, c = i.shape
    print(' split image H:%d W:%d'%(h, w))
    if ((args.vertical - x) % 2) == 0:    # -> flip
        i = cv2.flip(i, 0) #vertical
        i = cv2.flip(i, 1) #horizontal
    if(x == 0):
        final = i
    else:
        final = cv2.hconcat([final, i])   #stack horizontally

h, w, c = final.shape
print('final image H:%d W:%d'%(h, w))
im_pil = Image.fromarray(final)

matrix.Clear()
matrix.SetImage(im_pil, 0)
time.sleep(10)
Run the code.
root@raspberrypi:/home/pi/rpi-rgb-led-matrix/bindings/python/samples# python3 nbyn.py --file=star.jpg --horizontal=2 --vertical=2
Matrix H:32 W:256
Image size H:64 W:128
split image H:32 W:128
split image H:32 W:128
final image H:32 W:256
Now you can see the 128 X 64 size RGB LED Display.

<Vincent van Gogh's The Starry Night>
Henner Zeller suggests maximum 12 modules in one chain, however the maximum number of modules can vary depending on the performance of the Raspberry Pi and the PWM values that determine the number of colors the RGB matrix can represent.
Install OpenCV 4.1.1 to Raspberry Pi
We will install OpenCV in addition to the existing PIL for image processing.sudo apt-get install -y build-essential cmake pkg-config sudo apt-get install -y libjpeg-dev libtiff5-dev libjasper-dev libpng12-dev sudo apt-get install -y libavcodec-dev libavformat-dev libswscale-dev libv4l-dev sudo apt-get install -y libxvidcore-dev libx264-dev libgtk2.0-dev libgtk-3-dev libatlas-base-dev gfortran sudo apt--get install -y openexr libqtgui4 libqt4-test libhdf5-100 sudo apt-get install -y python3-dev python3-pip
sudo pip3 install opencv-python
Then modify the ~/.bashrc script. Add "export LD_PRELOAD=/usr/lib/arm-linux-gnueabihf/libatomic.so.1" line at the end of the file.
vim ~/.bashrc
source ~/.bashrc
Now verify that it is installed correctly.
pi@raspberrypi:~/rpi-rgb-led-matrix/bindings/python/samples $ python3
Python 3.7.3 (default, Apr  3 2019, 05:39:12)
[GCC 8.2.0] on linux
Type "help", "copyright", "credits" or "license" for more information.
>>> import cv2
>>> exit()
pi@raspberrypi:~/rpi-rgb-led-matrix/bindings/python/samples $ python3
Python 3.7.3 (default, Apr  3 2019, 05:39:12)
[GCC 8.2.0] on linux
Type "help", "copyright", "credits" or "license" for more information.
>>> import cv2
>>> cv2.__version__
'4.1.1'
>>>
We will use sudo to run Python programs with root privileges. If you use sudo command and OpenCV does not run properly due to environment variable problem, modify the root user's bashrc script and work as root instead of sudo.
$sudo su -
#vim ~/.bashrc
#source ~/.bashrc
Wrapping up
In the next post, I'll take an example of extracting a video frame and displaying it on an RGB LED matrix.You can download the source codes here(https://github.com/raspberry-pi-maker/IoT)


댓글
댓글 쓰기